A Tour with Rust
Rustup and cargo
1 | $ cargo --version |
cargo is Rust’s compilation manager, package manager, and general-purpose tool. You can use Cargo to start a new project, build and run your program, and manage any external libraries your code depends on.
rustc is the Rust compiler. Usually we let Cargo invoke the compiler for us, but sometimes it’s useful to run it directly.
rustdoc is the Rust documentation tool. If you write documentation in comments of the appropriate form in your program’s source code, rustdoc can build nicely formatted HTML from them. Like rustc, we usually let Cargo run rustdoc for us.
Create new package
1 | cargo new hello |
Run project with cargo
1 | cargo run |
When we’re through, Cargo can clean up the generated files for us
1 | cargo clean |
Function
1 | fn gcd(mut n: u64, mut m: u64) -> u64 { |
Writing test
1 |
|
Here we define a function named test_gcd, which calls gcd and checks that it returns correct values. The #[test] atop the definition marks test_gcd as a test function, to be skipped in normal compilations, but included and called automatically if we run our program with the cargo test command. We can have test functions scattered throughout our source tree, placed next to the code they exercise, and cargo test will automatically gather them up and run them all.
The #[test] marker is an example of an attribute. Attributes are an open-ended system for marking functions and other declarations with extra information, like attributes in C++ and C#, or annotations in Java. They’re used to control compiler warnings and code style checks, include code conditionally (like #ifdef in C and C++), tell Rust how to interact with code written in other languages, and so on. We’ll see more examples of attributes as we go.
Handling Command-Line Arguments
1 | use std::str::FromStr; |
The first use declaration brings the standard library trait FromStr into scope. A trait is a collection of methods that types can implement. Any type that implements the FromStr trait has a from_str method that tries to parse a value of that type from a string. The u64 type implements FromStr, and we’ll call u64::from_str to parse our command-line arguments. Although we never use the name FromStr elsewhere in the program, a trait must be in scope in order to use its methods. We’ll cover traits in detail in Chapter 11.
The second use declaration brings in the std::env module, which provides several useful functions and types for interacting with the execution environment, including the args function, which gives us access to the program’s command-line arguments.
Our main function doesn’t return a value, so we can simply omit the -> and return type that would normally follow the parameter list.
1 | numbers.push(u64::from_str(&arg) |
Here we call u64::from_str to attempt to parse our command-line argument arg as an unsigned 64-bit integer. Rather than a method we’re invoking on some u64 value we have at hand, u64::from_str is a function associated with the u64 type, akin to a static method in C++ or Java. The from_str function doesn’t return a u64 directly, but rather a Result value that indicates whether the parse succeeded or failed. A Result value is one of two variants:
A value written Ok(v), indicating that the parse succeeded and v is the value produced
A value written Err(e), indicating that the parse failed and e is an error value explaining why
Functions that do anything that might fail, such as doing input or output or otherwise interacting with the operating system, can return Result types whose Ok variants carry successful results—the count of bytes transferred, the file opened, and so on—and whose Err variants carry an error code indicating what went wrong. Unlike most modern languages, Rust does not have exceptions: all errors are handled using either Result or panic, as outlined in Chapter 7.
We use Result’s expect method to check the success of our parse. If the result is an Err(e), expect prints a message that includes a description of e and exits the program immediately. However, if the result is Ok(v), expect simply returns v itself, which we are finally able to push onto the end of our vector of numbers.
Serving Pages to the Web
For our first iteration, we’ll keep the web server simple: it will serve only the page that prompts the user for numbers to compute with. In actix-gcd/src/main.rs, we’ll place the following text:
1 | use actix_web::{web, App, HttpResponse, HttpServer}; |
We start with a use declaration to make some of the actix-web crate’s definitions easier to get at. When we write use actix_web::{…}, each of the names listed inside the curly brackets becomes directly usable in our code; instead of having to spell out the full name actix_web::HttpResponse each time we use it, we can simply refer to it as HttpResponse. (We’ll get to the serde crate in a bit.)
Our main function is simple: it calls HttpServer::new to create a server that responds to requests for a single path, “/“; prints a message reminding us how to connect to it; and then sets it listening on TCP port 3000 on the local machine.
The argument we pass to HttpServer::new is the Rust closure expression || { App::new() … }. A closure is a value that can be called as if it were a function. This closure takes no arguments, but if it did, their names would appear between the || vertical bars. The { … } is the body of the closure. When we start our server, Actix starts a pool of threads to handle incoming requests. Each thread calls our closure to get a fresh copy of the App value that tells it how to route and handle requests.
The closure calls App::new to create a new, empty App and then calls its route method to add a single route for the path “/“. The handler provided for that route, web::get().to(get_index), treats HTTP GET requests by calling the function get_index. The route method returns the same App it was invoked on, now enhanced with the new route. Since there’s no semicolon at the end of the closure’s body, the App is the closure’s return value, ready for the HttpServer thread to use.
The get_index function builds an HttpResponse value representing the response to an HTTP GET / request. HttpResponse::Ok() represents an HTTP 200 OK status, indicating that the request succeeded. We call its content_type and body methods to fill in the details of the response; each call returns the HttpResponse it was applied to, with the modifications made. Finally, the return value from body serves as the return value of get_index.
Since the response text contains a lot of double quotes, we write it using the Rust “raw string” syntax: the letter r, zero or more hash marks (that is, the # character), a double quote, and then the contents of the string, terminated by another double quote followed by the same number of hash marks. Any character may occur within a raw string without being escaped, including double quotes; in fact, no escape sequences like " are recognized. We can always ensure the string ends where we intend by using more hash marks around the quotes than ever appear in the text.
Having written main.rs, we can use the cargo run command to do everything needed to set it running: fetching the needed crates, compiling them, building our own program, linking everything together, and starting it up:
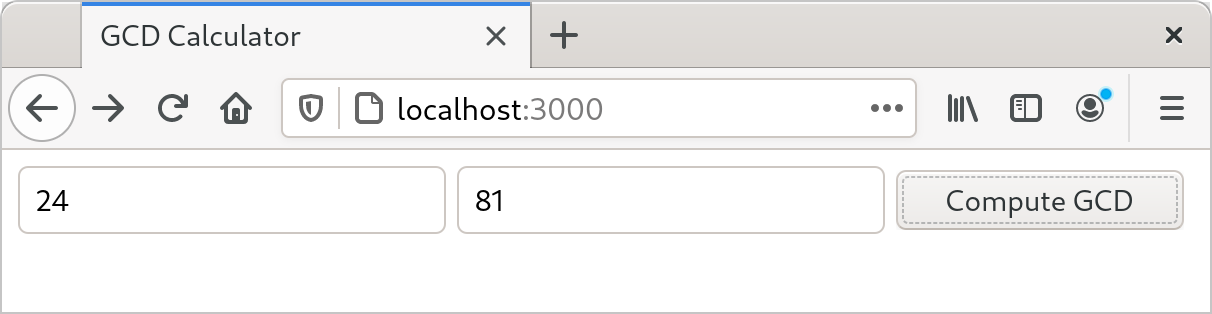
At this point, we can visit the given URL in our browser and see the page shown earlier in Figure 2-1.
Unfortunately, clicking Compute GCD doesn’t do anything, other than navigate our browser to a blank page. Let’s fix that next, by adding another route to our App to handle the POST request from our form.
It’s finally time to use the serde crate we listed in our Cargo.toml file: it provides a handy tool that will help us process the form data. First, we’ll need to add the following use directive to the top of src/main.rs:
1 | use serde::Deserialize; |
Rust programmers typically gather all their use declarations together toward the top of the file, but this isn’t strictly necessary: Rust allows declarations to occur in any order, as long as they appear at the appropriate level of nesting.
Next, let’s define a Rust structure type that represents the values we expect from our form:
1 |
|
This defines a new type named GcdParameters that has two fields, n and m, each of which is a u64—the argument type our gcd function expects.
The annotation above the struct definition is an attribute, like the #[test] attribute we used earlier to mark test functions. Placing a #[derive(Deserialize)] attribute above a type definition tells the serde crate to examine the type when the program is compiled and automatically generate code to parse a value of this type from data in the format that HTML forms use for POST requests. In fact, that attribute is sufficient to let you parse a GcdParameters value from almost any sort of structured data: JSON, YAML, TOML, or any one of a number of other textual and binary formats. The serde crate also provides a Serialize attribute that generates code to do the reverse, taking Rust values and writing them out in a structured format.
With this definition in place, we can write our handler function quite easily:
1 | fn post_gcd(form: web::Form<GcdParameters>) -> HttpResponse { |
For a function to serve as an Actix request handler, its arguments must all have types Actix knows how to extract from an HTTP request. Our post_gcd function takes one argument, form, whose type is web::Form
Looking inside post_gcd, the function first returns an HTTP 401 BAD REQUEST error if either parameter is zero, since our gcd function will panic if they are. Then, it constructs a response to the request using the format! macro. The format! macro is just like the println! macro, except that instead of writing the text to the standard output, it returns it as a string. Once it has obtained the text of the response, post_gcd wraps it up in an HTTP 200 OK response, sets its content type, and returns it to be delivered to the sender.
We also have to register post_gcd as the handler for the form. We’ll replace our main function with this version:
1 | fn main() { |
The only change here is that we’ve added another call to route, establishing web::post().to(post_gcd) as the handler for the path “/gcd”.
The last remaining piece is the gcd function we wrote earlier, which goes in the actix-gcd/src/main.rs file. With that in place, you can interrupt any servers you might have left running and rebuild and restart the program:
This time, by visiting http://localhost:3000, entering some numbers, and clicking the Compute GCD button, you should actually see some results (Figure 2-2).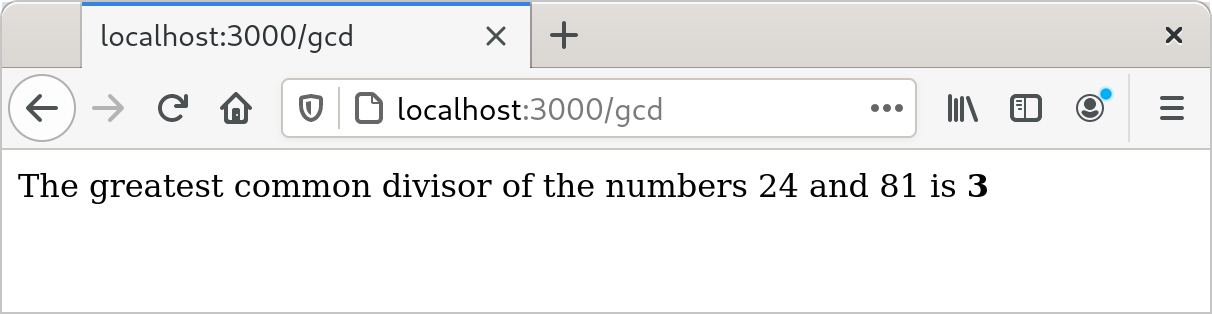
Concurrency
One of Rust’s great strengths is its support for concurrent programming. The same rules that ensure Rust programs are free of memory errors also ensure threads can share memory only in ways that avoid data races. For example:
If you use a mutex to coordinate threads making changes to a shared data structure, Rust ensures that you can’t access the data except when you’re holding the lock, and releases the lock automatically when you’re done. In C and C++, the relationship between a mutex and the data it protects is left to the comments.
If you want to share read-only data among several threads, Rust ensures that you cannot modify the data accidentally. In C and C++, the type system can help with this, but it’s easy to get it wrong.
If you transfer ownership of a data structure from one thread to another, Rust makes sure you have indeed relinquished all access to it. In C and C++, it’s up to you to check that nothing on the sending thread will ever touch the data again. If you don’t get it right, the effects can depend on what happens to be in the processor’s cache and how many writes to memory you’ve done recently. Not that we’re bitter.
In this section, we’ll walk you through the process of writing your second multi-threaded program.
You’ve already written your first: the Actix web framework you used to implement the Greatest Common Divisor server uses a pool of threads to run request handler functions. If the server receives simultaneous requests, it may run the get_form and post_gcd functions in several threads at once. That may come as a bit of a shock, since we certainly didn’t have concurrency in mind when we wrote those functions. But Rust guarantees this is safe to do, no matter how elaborate your server gets: if your program compiles, it is free of data races. All Rust functions are thread-safe.
Filesystems and Command-Line Tools
Rust has found a significant niche in the world of command-line tools. As a modern, safe, and fast systems programming language, it gives programmers a toolbox they can use to assemble slick command-line interfaces that replicate or extend the functionality of existing tools. For instance, the bat command provides a syntax-highlighting-aware cat alternative with built-in support for paging tools, and hyperfine can automatically benchmark anything that can be run with a command or pipeline.
While something that complex is out of scope for this book, Rust makes it easy to dip your toes into the world of ergonomic command-line applications. In this section, we’ll show you how to build your own search-and-replace tool, complete with colorful output and friendly error messages.
To start, we’ll create a new Rust project:
1 | $ cargo new quickreplace |
For our program, we’ll need two other crates: text-colorizer for creating colorful output in the terminal and regex for the actual search-and-replace functionality. As before, we put these crates in Cargo.toml to tell cargo that we need them:
1 | [package] |
Rust crates that have reached version 1.0, as these have, follow the “semantic versioning” rules: until the major version number 1 changes, newer versions should always be compatible extensions of their predecessors. So if we test our program against version 1.2 of some crate, it should still work with versions 1.3, 1.4, and so on; but version 2.0 could introduce incompatible changes. When we simply request version “1” of a crate in a Cargo.toml file, Cargo will use the newest available version of the crate before 2.0.
The Command-Line Interface
The interface for this program is quite simple. It takes four arguments: a string (or regular expression) to search for, a string (or regular expression) to replace it with, the name of an input file, and the name of an output file. We’ll start off our main.rs file with a struct containing these arguments:
1 |
|
The #[derive(Debug)] attribute tells the compiler to generate some extra code that allows us to format the Arguments struct with {:?} in println!.
In case the user enters the wrong number of arguments, it’s customary to print out a concise explanation of how to use the program. We’ll do this with a simple function called print_usage and import everything from text-colorizer so we can add some color:
1 | use text_colorizer::*; |
Simply adding .green() to the end of a string literal produces a string wrapped in the appropriate ANSI escape codes to display as green in a terminal emulator. That string is then interpolated into the rest of the message before it is printed.
Now we can collect and process the program’s arguments:
1 | use std::env; |
In order to get the arguments the user has entered, we use the same args iterator as in the previous examples. .skip(1) skips the iterator’s first value (the name of the program being run) so that the result has only the command-line arguments.
The collect() method produces a Vec of arguments. We then check that the right number is present and, if not, print a message and exit with an error code. We again colorize part of the message and use .bold() to make the text heavier, as well. If the right number of arguments is present, we putt them in an Arguments struct, and return it.
Then we’ll add a main function that just calls parse_args and prints the output:
1 | fn main() { |
At this point, we can run the program and see that it spits out the right error message:
1 | $ cargo run |
If you give the program some arguments, it will instead print out a representation of the Arguments struct:
1 | $ cargo run "find" "replace" file output |
This is a very good start! The arguments are correctly picked up and placed in the correct parts of the Arguments struct.
Reading and Writing Files
Next, we need some way to actually get data from the filesystem so we can process it, and write it back when we’re done. Rust has a robust set of tools for input and output, but the designers of the standard library know that reading and writing files is very common, and they’ve made it easy on purpose. All we need to do is import one module, std::fs, and we get access to the read_to_string and write functions:
1 | use std::fs; |
std::fs::read_to_string returns a Result<String, std::io::Error>. If the function succeeds, it produces a String. If it fails, it produces a std::io::Error, the standard library’s type for representing I/O problems. Similarly, std::fs::write returns a Result<(), std::io::Error>: nothing in the success case, or the same error details if something goes wrong.
1 | fn main() { |
Here, we’re using the parse_args() function we wrote beforehand and passing the resulting filenames to read_to_string and write. The match statements on those functions’ outputs handle errors gracefully, printing out the filename, the provided reason for the error, and a little pop of color to get the user’s attention.
With this updated main function, we can run the program and see that, of course, the contents of the new and old files are exactly the same:
1 | $ cargo run "find" "replace" Cargo.toml Copy.toml |
The program does read in the input file Cargo.toml, and it does write to the output file Copy.toml, but since we haven’t written any code to actually do finding and replacing, nothing in the output has changed. We can easily check by running the diff command, which detects no differences:
1 | $ diff Cargo.toml Copy.toml |
Find and Replace
The final touch for this program is to implement its actual functionality: finding and replacing. For this, we’ll use the regex crate, which compiles and executes regular expressions. It provides a struct called Regex, which represents a compiled regular expression. Regex has a method replace_all, which does exactly what it says: it searches a string for all matches of the regular expression and replaces each one with a given replacement string. We can pull this logic out into a function:
1 | use regex::Regex; |
Note the return type of this function. Just like the standard library functions we used earlier, replace returns a Result, this time with an error type provided by the regex crate.
Regex::new compiles the user-provided regex, and it can fail if given an invalid string. As in the Mandelbrot program, we use ? to short-circuit in case Regex::new fails, but in this case the function returns an error type specific to the regex crate. Once the regex is compiled, its replace_all method replaces any matches in text with the given replacement string.
If replace_all finds matches, it returns a new String with those matches replaced with the text we gave it. Otherwise, replace_all returns a pointer to the original text, avoiding unnecessary memory allocation and copying. In this case, however, we always want an independent copy, so we use the to_string method to get a String in either case and return that string wrapped in Result::Ok, as in the other functions.
Now, it’s time to incorporate the new function into our main code:
1 | fn main() { |
With this final touch, the program is ready, and you should be able to test it:
1 | $ echo "Hello, world" > test.txt |
And, of course, the error handling is also in place, gracefully reporting errors to the user:
1 | $ cargo run "[[a-z]" "0" test.txt test-modified.txt |
There are, of course, many features missing from this simple demonstration, but the fundamentals are there. You’ve seen how to read and write files, propagate and display errors, and colorize output for improved user experience in the terminal.
Future chapters will explore more advanced techniques for application development, from collections of data and functional programming with iterators to asynchronous programming techniques for extremely efficient concurrency, but first, you’ll need the next chapter’s solid foundation in Rust’s fundamental data types.